Home

User Guide V0.2
Contents
1.0 First start of Nathan
2.0 Typical usage of Nathan
2.1 Creating a taxonomy
2.2 Importing documents
2.3 Navigating the repository
2.4 Editing the repository
2.5 Editing documents
3.0 The Import filter tool
3.1 What are filters and how do they work?
3.2 How do I manage filters in Nathan?
1.0 First start of Nathan
When you start Nathan the first time following the instructions provided in doc/install.txt, you see something like this.
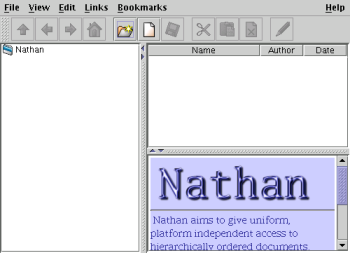
The repository is totally empty and only the root folder "Nathan" exists in the taxonomy.
The layout of the GUI is similar to common hierarchy editing applications like Windows Explorer, Konquerer or most EMail clients. It consists of several areas with distinct properties and abilities.
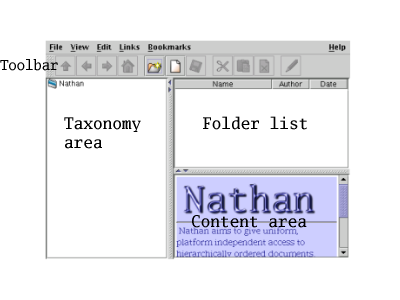
The Taxonomy area enables you to quickly browse the tree of folders describing your taxonomy.
The Folder list lists the content (documents and folders) of the currently selected folder.
The Content area displays the document currently selected in the Folder list. There are two modes for displaying: displaying for viewing (read-only) and displaying for editing (read-write). Viewing is the default mode. The display mode can be toggled by the Toggle Button in the Toolbar
The Toolbar contains a number of clickable icons which represent actions that can be applied to the Nathan repository.
The Menu provides an alternative way of accessing the functionality from the Toolbar. Some additional features can be found in the Menu like help functions or "quit".
2.0 Typical usage of Nathan
2.1 Creating a taxonomy
You can create a new folder by clicking  or selecting File/New/Folder from the Menu. You then have to enter the name of the new folder in a small dialog. The new folder can now be seen in the Repository area and in the Folder list.
2.2 Importing documents
You can import documents into the Nathan repository by clicking  or selecting File/New/Node from the Menu. An file selection dialog opens where you can choose files and directories that you want to import. Directories will be imported recursivly. Problems during the importing process are reported through error messages.
Please note: When importing a file into the Nathan repository, the system stores a copy of the original file internally. When you edit a document in Nathan there still remains the original version. This version can be accessed through the File/Export Original Menu option.
2.3 Navigating the repository
Navigation in Nathan is very similar to file managers or web browsers.
 changes to the parent folder of the currently selected folder.
 returns to the root folder "Nathan".
 and
and  navigate the history of visited nodes backwards and forwards like in a web browser.
2.4 Editing the repository
Nathan provides standard mechanisms for manipulating the repository structure.
 and
and  allow the user to cut and paste nodes and folders.
 deletes nodes and folders selected in the Folder list.
2.5 Editing documents
To edit a document you must first select it so that it's content is displayed in the Content area. Then you have to change to Edit mode by clicking on the toggle button. This button looks like  to change to Edit mode. To change to Viewing mode the button looks like
  .
.
Note that not all document types have a viewer and/or an editor associated with them.
If you are in Edit mode, you can change the content as the editor allows. As soon as you have made any changes, the Save button  becomes enabled. Click it to save your changes. If you select a different node while the last node is not saved, a suitable warning will be displayed.
If you want to revert the state of your edited document to the last saved version, simply hit the Reload button  .
.
3.0 The Import filter tool
Since the first release Nathan has had an integrated filter for importing documents. But this was handled by a undocumented config file. As of Nathan 0.1.2 there is a easy to use GUI which shall be explained here.
3.1 What are filters and how do they work?
With the help of the tool the user can define filter rules which are applied to documents during the import process. A rule consists of a pattern and an action. A document is matched against the patterns of the defined rules. When a mathching pattern is found, the specified action is executed. Similar filters are known from common email clients.
At the moment the pattern consists of a fixed property field of the document and a keyword. A rule matches if the keyword is contained in the specified property. The properties currently supported are "To", "From", "Subject", "Body" and "Name". From these only "Body" and "Name" work. The others are used for a still-to-be-released importer for emails.
The action is determined by a target folder into which the matching document shall be moved.
3.2 How do I manage filters in Nathan?
You can open the Import filter tool by selecting the "Manage Filters" option in the File menu.
The following dialog will open.

You can see a list of the defined filter rules. On the bottom there are a couple of buttons which enable you to manipulate the filters. The following operations are possible.
Adding Filter / Edit Filter enables you to create or change a filter. The following dialog pops up to let you do that.
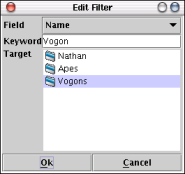
You can choose the field, keyword and target folder defining the filter rule using this dialog.
As usual double-clicking on a folder changes the view to the appropriate subfolder. The first item is always the superfolder so you can move up and down the taxonomy.
The Delete button removes the selected filter from your filter list.
Move up / Move down changes the position of the selected filter in the list. As filters are matched in sequentiell order (from top to bottom) and only the first matching rule is actually applied to a document, the order might be important if more than one rules match.
Close simply closes the dialog.
Home
(c) by Jan Schröter - Last edited: 25. Jan. 2003